
Pimoroni


Interstate 75 W is a RP2350-based driver board for HUB75-style LED matrices - they're the chainable LED panels (32 x 32 or 32 x 64) that you sometimes see making up video walls or big advertising displays. It's designed to plug neatly into the back of a LED panel, and it provides a quick and easy way to whip up some scrolling signage or an eye-catching LED display for sensor outputs. I75 W has wireless connectivity so you can also use it to display information from the internet! ????
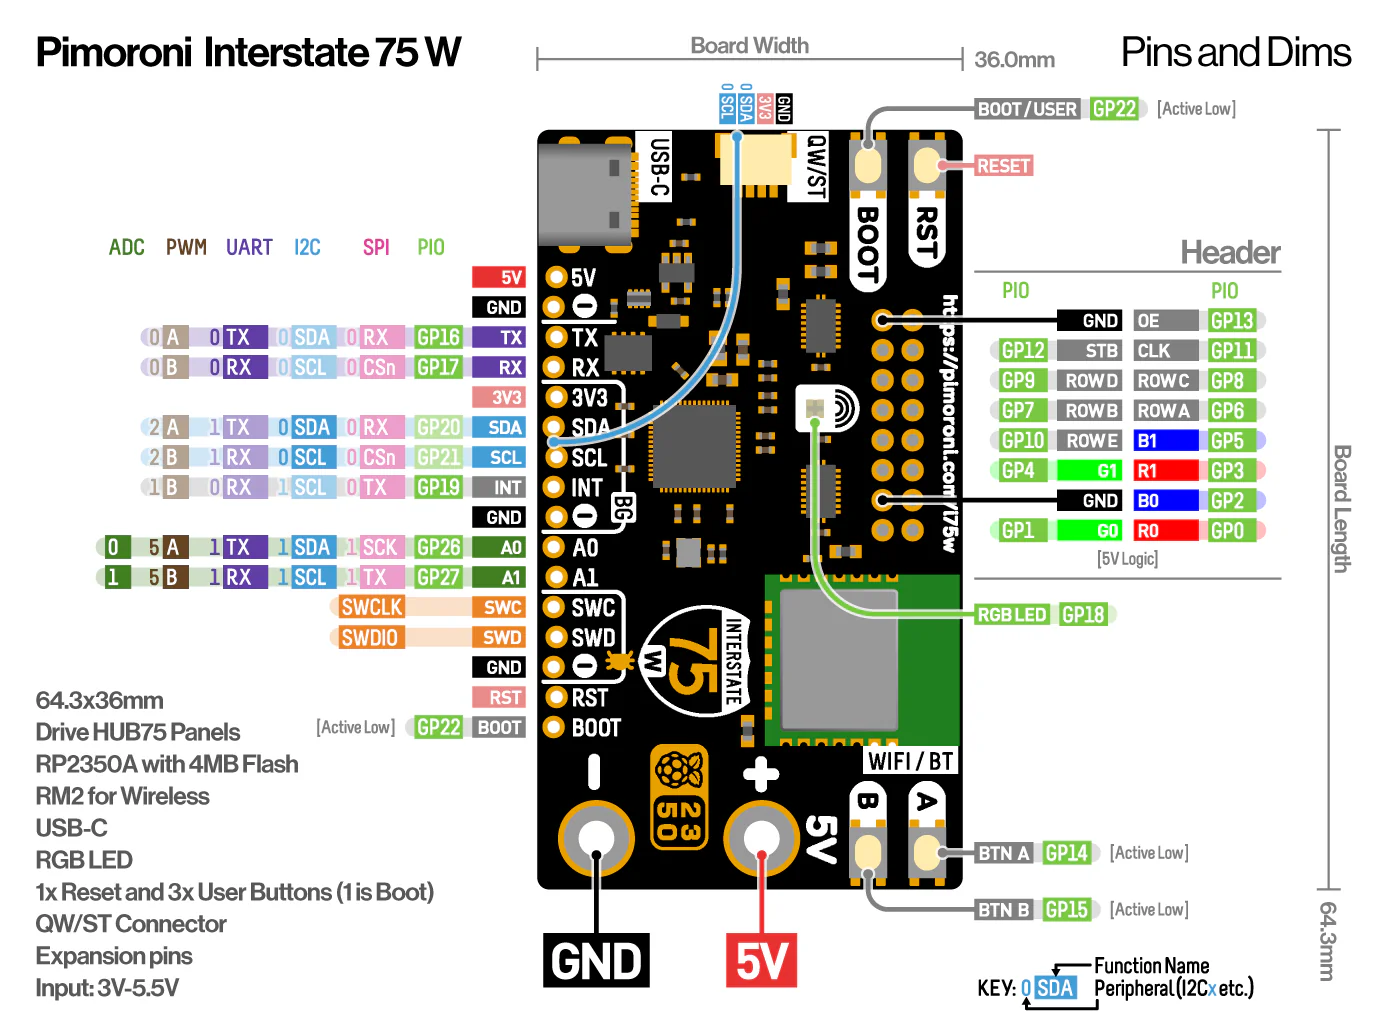
It's powered via USB-C, which should also be able to power a few connected panels happily, assuming you're not planning anything too eye-bleedingly bright. It has three handy user buttons (A, B and BOOT) and an onboard RGB LED.
We've also popped a Qw/ST connector on there, to make it super easy to plug in Qwiic or STEMMA QT breakouts.
Here are some things you could do!
???? Tap into an API and display bus times, plane tracking or traffic info.
???? Generate a big bold graph showing air quality or other sensor readings.
???? Create some ad hoc, easily adjustable signage for your classroom, maker stall or kebab shop.
???? Scroll greetz to your crew, just like in the old days:
"`-._,-'"`-._,-' HACKED AND PACKED BY PIMORONI "`-._,-'"`-._,-'
Features
- Powered by RP2350A (Dual Arm Cortex M33 running at up to 150MHz with 520KB of SRAM)
- 4MB of QSPI flash supporting XiP
- Raspberry Pi RM2 module (CYW43439), supporting IEEE 802.11 b/g/n wireless LAN, and Bluetooth
- Compatible with our 32x32, 32x64, 64x64 and 128x64 LED matrices.
- Sturdy screw terminals for powering the LED panels
- USB-C connector for programming and power
- Two user buttons (labelled A and B)
- Reset and boot buttons (the boot button can also be used as a user button)
- RGB LED
- Qw/ST (Qwiic/STEMMA QT) connector
- Comes fully-assembled (no soldering required)
- Programmable with C/C++ or MicroPython
What's in the box?
1 x Interstate 75 Matrix driver board
Resources
Pinout and Schematic
Getting Started
You can find the most recent version of the MicroPython firmware and examples at the link below:
Connecting Breakouts
I75 W has a Qw/ST (AKA Qwiic/STEMMA QT) connector, so you can connect up Qw/ST breakouts easily using a JST-SH to JST-SH cable.
We've also broken out a bunch of useful pins along the bottom edge of the board (including I2C, analog, UART and debug pins) so you can solder things like breakouts or analog potentiometers directly to them.
Notes
- Measurements: approx 64.3 x 36 x 17mm (L x W x H, including connectors)
About RP2350
The RP2350 chip is the Double Quarter Pounder & Fries to the RP2040's Double Cheeseburger and can have one or more RISC-V burgers instead of either of the M33 ARMs, to stretch the metaphor.
In addition to the modern M33 ARM cores, there are sides of: more PIO capability, a variety of low power states for sipping electrons, a whole security system and some sprinklings of specialist digital video circuits to offload DVI/HDMI output.
You can expect a tasty boost in performance - our "real world" MicroPython tests are running up to 2x faster compared to RP2040, and floating point number crunching in C/C++ is up to 20x faster. The extra on-chip RAM will make a big difference when performing memory intensive operations (such as working with higher resolution displays) and even more can be added thanks to external PSRAM support.
RP2350 comes in two flavours - A (standard) and B (all the pins). The B chip has a stonking 48 usable GPIO pins, including 8 ADCs and 24 PWMs, and features on some of our new products.
Swap out your Picade's arcade buttons for the crystal clear ones in this kit, pop one of the Picade Plasma PCBs over the button's spade terminals, hold the PCB in place with the spade connectors, and chain all of the Plasma PCBs together with the included cables. Use the host cable to connect the Plasma chain to your Picade X HAT, install our Picade Plasma software, and BAM, your Picade is 110% more colourful!
Each Picade Plasma PCB has four tiny, addressable, RGB LEDs (APA102) and a data in and data out JST connector. They're designed to fit neatly inside the recess on the back of our low-profile arcade buttons and shine their light through the clear plastic. The white PCB bounces an spilled light from the LEDs to give them extra GLOW.
Picade Plasma Features
- APA102 addressable RGB LEDs
- Chain-able
- JST connectors for data in and data out
- Designed for our low-profile arcade buttons
- Connects to the Hack Header on our Picade X HAT
- Python daemon
What's in the box?
10 x clear 30mm push-fit arcade buttons
10 x Picade Plasma PCBs
5 x 10cm button cables
4 x 30cm buttons cables
1 x 30cm host cable
Resources
As well as using Plasma buttons with Picade and Picade X HAT, you can connect them straight to GPIO on your Pi, or other microcontroller. This makes them ideal for DIY arcade builds and even building things like your own DIY midi controller.
You can read our tutorial on fitting Picade Plasma buttons to find out how to fit the buttons and control them with the Picade Plasma software.
Notes
- PCB dimensions: 24mm diameter, 5.75mm thick (including JST connector)
- LED brightness is limited to a sensible level in software. Adjust this at your peril!
- Picade Console is for illustration only, and not included!

Scoring very highly in the Pimoroni "things on our desk that make people say ooo" rankings, RGB Keypad Base equips a Pico with an eye-catching 4x4 silicone keypad, fully loaded with addressable APA102 LEDs so that each key can be illuminated in any colour that your little unicorn heart desires. It's all mounted on a sturdy base with rubber feet to keep it nice and level, with a handily labelled landing area for your Pico. We've broken out the full set of Pico pins to make it easy to connect up other hardware as well.
Connect your Pico project to another computer via USB for a beautiful macro keypad or a tidy midi controller. RGB Keypad Base would also work well in any project that would benefit from having fancy light up buttons as inputs - a code protected door lock perhaps, a disco dance floor for your fingers or a Simon Says style game with which to taunt your friends.
A Raspberry Pi Pico is not included - click here if you'd like to buy one!
Your Pico will need to have male headers soldered to it (with the pins pointing downwards) to attach to our add-on boards.
Features
- 4x4 silicone keypad with conductive buttons
- 16 x APA102 addressable RGB LEDs (datasheet)
- Keypad buttons are connected via a TCA9555 IO expander (I2C address: 0x20).
- Labelled landing area with female headers for attaching your Pico, with broken out pins.
- Compatible with Raspberry Pi Pico.
- Some assembly required!
- No soldering required (as long as your Pico has header pins attached).
- Dimensions: approx 60mm x 101mm x 16mm (L x W x H, assembled)
- C/C and MicroPython libraries
Includes
- 1x Pico RGB Keypad Base
- 1x (reversible) square retainer plate
- 1x silicone keypad
- M2 8mm bolts and nuts
- 4x rubber feet
Getting started
Turn the larger board over, and attach the little rubber feet to the paw print spaces on the bottom.
Flip it over again, and pop the silicone keypad over the buttons so the tabs fit into the holes. You can then slot the retainer plate over the top of the keys, matching up the key markings with those on the base board. You can install the retainer plate either way up, depending on whether you prefer it patterned or plain!
Poke the M2 bolts through the holes in the mounting plate (from the top) and screw on the nuts to keep all the layers sandwiched together. The bolts only need to be tightened up enough to keep the layers in place - if you find that the keys are hard to push or that the silicone layer is bulging out of the sides you might want to slacken them off a bit.
The labels on the base will show you which way round to attach your Pico - just match up the USB port to the markings on the board.
The easiest way to get started is by downloading and copying our custom MicroPython uf2 to your Pico, it includes all the libraries you'll need to use our add-ons. Click here for our beginner friendly tutorial!
You can find C examples here and MicroPython examples here.
